Total Pageviews

Sunday, October 9, 2011

SEO for Digital Film Colorist: Wordpress SEO


This posting is about creating SEO for use in a Wordpress site. This site uses a  Fullscreen Graph Paper Press theme and Wordpress 3.2.1


I've used several SEO related plugins to help with the SEO on Digitalfilmcolorist.com.  SEO can be built in part by adding a few features like a site map, meta tags and validating html which I've done.  Perhaps most important is good content. You can improve your search-ability by having lots of good written text content on each page. That means at some point you might want to think of what sort of text descriptions you could include somewhere in your site. For an all around SEO it also helps to have lots of links on other sites pointing towards your site (browsers read this to mean your site is important) so if you can link from other sites to this site, or ask other friends or associates to link to your site you can improve your ratings.  Wordpress can tell you more about SEO here.


I submitted Digitalfilmcolorist.com to Google and Yahoo. Submitting a site description to a browser helps them find and list your site properly and more rapidly than if it is left to be discovered by browsers over time. I last submitted your site on October 9, 2011- it should not be done more than once a month, and each submission can take up to 10 days ( or as few as two) to show up as changed in a browser.  You can submit your site to Google here.  You can submit your site to Yahoo here.  Read here that it does not make a difference if you submit and resubmit your site often. It is something that should be done when significant changes are made to the site.

Meta Tags have been created for your site. Learn about meta tags here.  I used text from your bio and a definition of color grading from Wikipedia to generate some additional common text so that if someone searches color grading or digital film coloring they will hit on this very popular string of text that is also associated with your site:

"Color grading or colour painting, is the process of altering and enhancing the color of a motion picturevideo image, or still image either electronically, photo-chemically or digitally."

This phrase appears only in meta tags and will not be visible in your site, but will show up in the site description when browsers search for you or "digital film colorist" or "color grading".  I used an online tool for taking the bio text of your site and  I gathered basic descriptions of the movies you have worked on and loaded these into a keyword generator. The keywords used in your site are the most popular words that can be used in association with your site. That's a basic description... You can change the text in your site description and your keywords by changing the  description in the Add Meta Tags plugin. Keep reading to learn about this plugin...

The text on digitalfilmcolorist.com is very minimal. Increasing text could increase traffic over time. In particular you may try to use important words frequently that you suspect people will be looking for in your site. For example, the name "Paul Byrne" and the words "digital film colorist". If the name "Paul Byrne" appears 10 times on this site and 3 times on another site,  a browser will take you to the page with ten mentions first.

The meta tag tool used on your site is named in the Plugins section as Add Meta Tags. You can change the info in this section by looking in the "Settings" section of your blogs dashboard. In this 
menu click on "Meta Tags" and you will see all the info that this Plugin manages.  Read more about SEO and  this plugin to 
learn how to manipulate this section.  You'll need to read about how keywords and meta tags work in order to make 
relevant changes to this section.

Another SEO element that has been added to your site is a site map. Read about what a site map is and how it works here.
A plugin has been used to build a site map for your site. Look in the Plugins section of your dashboard. The Plugin in use on your site is Google (XML) Sitemaps Generator for WordPress.  You will need to read about this plugin and about site maps in general to make relevant changes to this plugin. To make changes Click on the "settings" section of Plugin. 


That should get you off to a good start!


Monday, September 5, 2011

Backing up your Wordpress site

Note:  Short and sweet, I've added this to this post as one of the better, really easy examples I found on how to backup your site with Filezilla:

Hello, I'm Dave. How to back up your site using Filezilla FTP

There is a plethora of material written about backing up your site so I'll let the pros do the talking.  You can download your site via an FTP client and I suggest Filezilla- it's fast and free and easy to use. Here's more on the backup process... you'll want to backup your files and your database. Both can be downloaded in about 10min.

Backing Up your Wordpress Site - this link contains many options for continually backing up your site. Choose one that is right for you, or backup your site after you make additions or changes on a case by case basis.

here's a bit about FTP clients and Filezilla

and here's a page about using Filezilla.


Download, save, copy as many times as you like to as many locations as you like.

To download a copy of the MYSQL database I simply logged into GoDaddy and into the FTP file manager. I went to the appropriate folder labeled

_db_backups

I downloaded the folders labeled "dig....." there are two folders with this label. I downloaded them and saved them both after archiving the MySQL databases.

Creating a local copy of your site: setting up PHP or a dummy site

Here is a link to setting up PHP on your Mac. It is a bit of a process but will allow you to try out edits on your blog before you upload them.

Here are instructions for the same process for a PC.

Another option I am fond of is creating a dummy site. I create a dummy site and load stock images and plugins to a site with the exact same parameters to my own site. I test things here before I edit my professional important site.  This Dummy site method has been extremely helpful and allows me to work completely online. This way I can quickly test options live and  run a manipulated page through multiple browsers.

Ghost in the Shell: Visual Editor in posts hides navigation

Posts are funny things. They have a few features that Wordpress keeps enabling and then disabling every few times it releases a new version and this time the "<prev" and "next>" buttons are automatically disabled. Maybe that's for the best. When they are enabled they are hard to customize and move around. The code for manipulating them is buried deep inside the Wordpress core. There have been a number of plugins that try to solve the problem but if you use both posts and pages in your site and want the "prev" and "next" buttons to look alike on each type of publication you are out of luck: plugins add navigation buttons for either posts or pages but I haven't seen any that added the same sort of button for both so  a user is left to manually build navigation buttons if they can't make the menu work as they would like.

In this case though I get the feeling of "can't live with 'em , can't live without 'em". In making my own manual navigation at the bottom of the posts pages I use the words previous and next. Wordpress seems to pick these up and hide them in the Visual editor, making editing a bit of a pain. Here everything must be edited in the HTML view.

One must click "edit post" avoid viewing the "Visual" tab go straight to the "HTML" view and add new links manually there.

I'll keep looking for a solution for this, but until then copy and paste the general code form previous posts into a new post and edit links by cutting and pasting them in place. I've listed this issue with Wordpress codex.


Oh Wordpress.


Ghost in the Shell: Fighting off comments!

Well I've had highs and lows with hiding post comments.  Several plugins failed to do the job and now I've pulled another and added a new one that seems to have 5 star reviews and about 7K downloads which is promising.


This one is called One Click Close Comments and it lives up to it's name.  Install this plugin and look at the "Posts" section. Click on "All Posts" and see that the plugin has placed a small red or green dot in the info about each post. Simply click on this and status will change. Green means comments are GO and red means comments are CLOSED.

Then check your post pages. A default message of "Comments are Closed" will appear.

Now go into the "Appearances" section. Click on "Editor". Go here only if you know what you are doing. Make sure site is backed up before you make any changes.  Look for <p></P> with "Comments are closed." message. Simply remove message! Don't change anything else. This time comments have vanished without leaving a trace and that's something worth celebrating.


Ghost in the Shell: Firefox might hate your .tiff file

While Safari and Google Chrome don't mind, Firefox might not like to show your .tiff file.  Avoid using .tiff files and instead use

.jpg

.gif

and

.png

filetypes. Firefox seems to digest these just fine.  Don't be fooled by the fact that you can indeed upload a .tiff file while using Wordpress in Firefox. When you get to the site, your image won't be there!

DFC custom notes: developing on a subdirectory, hosting on a root

I recently added files to the root of a host site that helps to direct my root web address to the subdirectory folder where I developed it. This is an easy process and takes about a half hour to do.

Visit the Wordpress codex and you'll find this advice. For my own transfer I started at step 7 of this instructional page:

http://codex.wordpress.org/Giving_WordPress_Its_Own_Directory

Then I came back and followed the advice of Wordpress guru Chris Coyier, from his nifty
book Digging Into Wordpress:(he is using "blackmothsuperrainbow" as his subdirectory, cuz he's
awesome, so substitute "wordpress" for "blackmothsuperrainbow" in the
below)

"You’ll now have to log in at
http://mydomain.com/blackmothsuperrainbow/wp-admin/, but WordPress
will be in control of the root just as if that were its actual
location. Once you have installed WordPress and logged in to the Admin
area, go to Settings > General and ensure that the settings for your
WordPress address (URL) points to
http://mydomain.com/blackmothsuperrainbow/ and Blog address (URL)
points to http://mydomain.com/. "

Now visit your site--- and Wordpress is neatly tucked away.  Check all of your links as certain plugins can cause make this switch over read a few links in a different way ( I'm not sure why). When I changed my website I had to update two links. Other than that the switch was a breeze!

DFC: templates for Navigation options

There are several options you can use for navigation in your site.  You can find descriptions of these and images of what they look like in the "Pages" section of your dashboard. Look under the "Pages" section and click on "All Pages" . Now look for pages that are called "Template #......." These are unpublished "draft" entries that only the owner of the site can see when they are in the dashboard.

Each template has an image of what a navigation model would look like. There are instructions on how you can use each  model and suggestions as to how a couple models could be combined if desired.  The model that is used on your site ( the requested model called "big button link") is also there so that if you change the style but want to revert to the old style you can. The requested model is labeled as "Template #5 Navigation: Big Button Link".

Out of all of the models the least complex is "Template #2: Exposed menu". This Template requires one change and to add a new image the owner to the site need only create a new page or post for the material.

The second most simple model is the "The Fake Sidebar" model . This model pushes the video right and leaves "prev" and "next" arrows below left. A menu for the three sections of the portfolio goes right. In the model I've provided there is room to expand the size of the video. The alignment of the arrows can be adjusted by changing the margin of the left most arrow. Remove the arrows and you will have jut a sidebar model for navigation that does not need to be updated when you add a new image.

The most manual is "Template #3: Arrows and Growing Menu". Template #3 is also the most transparent model as the code used to create it is very simple; that is to say it is the slow but steady way.


Remember that with all models you will need to add a thumbnail to the main pages of films, commercials, and showreels that links back to the new individual page you create for your content.

Above: Navigation #1: text and image

Above: Navigation #2: Exposed menu

Above: Navigation option #3: the All Image option

                                          Above: Navigation option #4: fake sidebar

Above: Navigation option #5: the Big Button Link w/ all thumbs 
at bottom as one, big button. This is the design requested for the site.


Sunday, September 4, 2011

DFC Custom Notes: Some basic html

As you go through your DFC site you'll see some basic html. It will be helpful if you can start to recognize what some of these mean and here's a bits of code you'll see very often. Go into any post or page and click in the "html" tag to see the code that shapes some of your site.


<p></p>      


...That open and closes a paragraph.
You'll see this for basic text that appears in a site:  <p> hello there! I am your site!</p>


<h2></h2>  
  
...Any tag that has "h" and a number is a bit of text that will appear with a variation in size.  The "h" stands for heading and the number stands for a size. The lower the number the bigger the size!


<iframe></iframe>


...These tags surround Vimeo content.


<p style="text-align: center;"> stuff stuff stuff</p>


...You can "style" text in a variety of ways. Most of the time I'm styling text by aligning it, though there are many things you can do to text with this tag.


<a href= "http://site.com></a>


...<a> stands for "anchor" > Anytime you see "<a href=" used you are looking at code that's pointing to a link. Below is an example of a link that has a lot of extras thrown in. The link below specifies a title for the link (that will appear on mouse over), tells that an image is what's being used in the link, tells where the image comes from in the host directory, and tells how large the image is. Wheh... lots of info in there....


<a title="ZEN ESTILO" href="http://digitalfilmcolorist.com/123-2/"><img class="alignleft size-medium wp-image-19" title="ZEN ESTILO" src="http://digitalfilmcolorist.com/wordpress/wp-content/uploads/2011/08/ZEN-ESTILO-300x225.jpg" alt="" width="180" height="136" /></a>


There's a really great source for learning about html and css called W3schools.com
This is a free site and even if you don't go through it in great details it can be used as a quick reference for you to understand what a bit of code is doing in your site. Just cut and paste a sample of code from your site into the W3schools search box!


DFC custom notes: site structure

In Building the DFC site the Fullscreen them Graph Paper Press Template I used posed some pretty interesting dilemmas...

First of all the home page or landing page rules the site. That's core to understanding the site because all organization bows the the restrictions imposed by this home pages which pulls images for display. It;s the first thing a visitor to the site sees so in this case, this page gets to be the big boss.

If you look at the home screen you will see two sets of thumbnails. At top are movie thumbnails, and at bottom are post thumbnails. This segregation of "page" and "post" images feeding into each area allows me to add images and updates to each location and have some sway over where the images go.  Generically this template pulls images from only posts.

The second factor about the home page that has influenced the organization of the site is that the images on the home page appear in order from most rest to last. That means if you put up an image it will pop up on the home page. But what if you don't want the new image on the home page? The nice part is that pages and posts are easy to organize by editing publish dates and in some cases using plugins to order pages.

For more info about how I ordered pages ( with the home page in mind all the while) see the post in this blog posts titled:

Adding order to posts in Wordpress

and

Organizing pages via Wordpress plugin

Thursday, September 1, 2011

Scale Images Wordpress: scaling images after upload

When I start building a site I usually rush to put up content. Its something like the feeling of a canvas being easier to work on after you've added that first dab of paint: the void is just a little too much to tackle on a whole and too much planning before you start can start to build anxiety or uncertainty around the actual beginning!


So that being said- I often upload images at a large scale and understand afterwards what the the realistic scale I'll need to use them at actually is.  You'll be glad to know that Wordpress has planned for this sort of behavior.

Go into your dashboard and go to the "Media" section. Under "Media" select library and find all of your images noted here. Hover over the image title and select "Edit" from the menu that appears below.
Once you are in the screen where you can edit your image look to the left and see "Scale Image". Select "Scale Image" and the panel will expand.

After loading my images of all sizes I realized the largest dimension any image would need in the site was 300px. I've gone back through my site and made 300px the cut off dimension for all of my images--- some images even have a cut off of 180px.

Scaling images in this way optimizes your site-- this means a page that shows an image at 100px by 100px doesn't spend time processing a much larger image and then scaling it down. The end result is a site where pages load as quickly as possible!

Sorting Images in Wordpress Media Library


A Wordpress media library can easily become muddled-- you may load more than one version of an image and only remember this later when you go to alter that image and have a hard time finding it. Another dilemma you may run across is that if you make the image titles something funny and distinct, when you mouse over the image you see this weird title pop up on your website or blog.

The solution to this is very simple and one that's easily overlooked. When you are in your dashboard look under the "Media" category and go into your"Library" here you see all the images and icons you've ever loaded.

Simple select "edit" in the menu that pops up when you hover over a title. This should pull up all the info for that image. Here you'll see the title to the image but look below to the catagory called "Alternate Text". This is the are where you can put the actual name you want a visitor to your site to see when they mouse over your image. Use the main title for your own purposes if you need to. You can keep the original title hidden and use it for indexing.

Also note that when you are viewing all images in the media library if you look across the categories of information you will see one called "attached to" and this will tell you where the image is currently being used in your site or the "Location of the uploaded file."


A tricky thing here to note is that if you load an image and then remove it form the site afterwards but want to keep in in the Media Library the file will still be noted as located in the page you originally upload it to. Hence my interest in using titles as labels!


Tuesday, August 30, 2011

Adding order to posts in Wordpress

This is pretty simple to do. I added all the posts I wanted to my site then went through one by one and edited the date of publish- most recent dates appear first in order.


To do this I simply went into "edit" each post. I look at the page where I compose a post under the "Publish" section.
I look at the text that says "Published on: Aug 6, 2011 @ 18:42 Edit". I click on edit. I numbered my posts starting form 1.1.2011 all the way up to 1.21.2011. I make a note that all my posts are published at noon. If I need to add a post I can pick an hour of publish that falls between two existing publish dates and times. If I need to add a new post that shows up as the most current I can just pick the next date in my series of dates and that will show up first OR I can pick an earlier date and my new post will go way down to being the last post in the batch.


Also I went to my dashboard again and I went into the permalinks section. Here I selected the option to order my posts by day and name.

Organizing pages via Wordpress Plugin My Page Order


I've organized my pages on Wordpress using a plugin called My Page Order created by Andrew Charlton. You can look up this plugin via Wordpress, or follow the link. This plugin does a few very helpful things. After install and activation, it creates a new section in the "Pages" category of your Dashboard. Look under the "Pages" section and you will see "My Page Order" has been added.


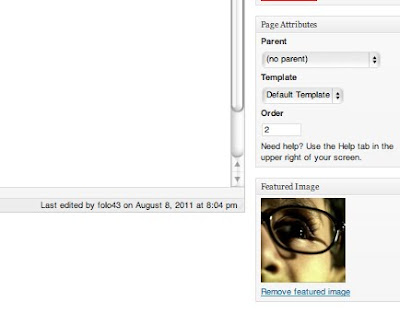
Click on this and you find yourself in a screen that lets you drag and drop pages into the order you want. Your pages will now have a number that appears in the " Page Attributes" section of your page when you view it in editing or composing mode.... See image below.


Removing comments and Author info- AGAIN!

I previously went through my Wordpress dashboard to edit a file called single.php on my site. Herein, I commented out a bit of text that added comments and author info to my posts- I want my site to look like a professional web page and I've done a few tricks here and there to remove all of the things Wordpress adds to give a site a more news driven and blog oriented look.

Hmm. Strangely enough a few weeks later the info came back. I've tried several Plugins on the site and am using several which may have added the info back in but honestly this was a hard bug to trace. Again, I'm using the Graph Paper Press theme called Fullscreen and I'm using Wordpress version 3.2.1

I'm using these plugins through out the site:

Asticky postorder

Shadowbox JS

My page order

Web Ninja Google Analytics

Jetpack ( Automatically active with the original Wordpress version 3.2.1)


Anyone of the first four may have re-activate the comments- hard to tell really. This time I have hidden the comments by adding a new plugin called "HIDE COMMENTS FEATURE" by Vitor Carvalho.

This removes the comment section from your Wordpress Dashboard and the comments and "leave a reply" section from your post pages. If your "prev" and "next" page navigation buttons are active it does not affect them.


Monday, August 8, 2011

Make part of link menu not active: Wordpress

I'm pulling form another page.
Here's how to have a menu with part of it (parent) as non-active

"Plus with the new Wordpress 3+ menus you don't need to install the plug-in, just create a custom menu item that points to the URL "#" and position it as the parent, then arrange your pages as its children. This means you can have some parents items that aren't pages at all while others can be both parent items and pages in their own right."

Tab for custom links is on the left I literally didn't see it until I needed it. Take out the "http://" stuff and just add "#".
Here's a link to original post where I found this. Thanks other bloggers!

Removing time, date author from Wordpress Fullscreen theme


I looked high and low for some widget to do the job but it did in fact boil down to changing the core code- which I hate to do but it's worked out alright this time.

The code that adds the metadata tag of time, date, author to posts in Wordpress is different in every theme as far as I can tell. Be aware of that first and foremost. I tried at least five other ways of changing this that other people noted had worked for them but which did not work for me.

Note that I am using the Fullscreen theme from Graph Paper Press. I am using Wordpress 3.2.1

I made my change to single.php

I commented out the time, date author using the code at left:
I left the navigation for prev. and next. Really I wish I could get that on to my pages... don't know why that's not an available option but oh that's Wordpress for you: making the simple into the impossible.

Here's a img. of where I made my edits. Click on img. for a large view. Good luck!

Saturday, August 6, 2011

Center a video on Wordpress


That's all!

Add PDF to Wordpress that you can download

For the sake of putting everything in one place, here's how to set up a PDF on wordpress so that you can download it.

Note on using Text Wrangler with Graph Paper Press Themes

Just a note that on using Graph Paper Press themes with wordpress I had issues with Text Wrangler adding some extra code to my php and sabotaging my whole set up to produce a syntax error. If you're editing a theme produced by this company or editing Wordpress in general be wary of this text editor. If anyone has better luck please post comments...