Total Pageviews

Monday, September 5, 2011

DFC: templates for Navigation options

There are several options you can use for navigation in your site.  You can find descriptions of these and images of what they look like in the "Pages" section of your dashboard. Look under the "Pages" section and click on "All Pages" . Now look for pages that are called "Template #......." These are unpublished "draft" entries that only the owner of the site can see when they are in the dashboard.

Each template has an image of what a navigation model would look like. There are instructions on how you can use each  model and suggestions as to how a couple models could be combined if desired.  The model that is used on your site ( the requested model called "big button link") is also there so that if you change the style but want to revert to the old style you can. The requested model is labeled as "Template #5 Navigation: Big Button Link".

Out of all of the models the least complex is "Template #2: Exposed menu". This Template requires one change and to add a new image the owner to the site need only create a new page or post for the material.

The second most simple model is the "The Fake Sidebar" model . This model pushes the video right and leaves "prev" and "next" arrows below left. A menu for the three sections of the portfolio goes right. In the model I've provided there is room to expand the size of the video. The alignment of the arrows can be adjusted by changing the margin of the left most arrow. Remove the arrows and you will have jut a sidebar model for navigation that does not need to be updated when you add a new image.

The most manual is "Template #3: Arrows and Growing Menu". Template #3 is also the most transparent model as the code used to create it is very simple; that is to say it is the slow but steady way.


Remember that with all models you will need to add a thumbnail to the main pages of films, commercials, and showreels that links back to the new individual page you create for your content.

Above: Navigation #1: text and image

Above: Navigation #2: Exposed menu

Above: Navigation option #3: the All Image option

                                          Above: Navigation option #4: fake sidebar

Above: Navigation option #5: the Big Button Link w/ all thumbs 
at bottom as one, big button. This is the design requested for the site.


Sunday, September 4, 2011

DFC Custom Notes: Some basic html

As you go through your DFC site you'll see some basic html. It will be helpful if you can start to recognize what some of these mean and here's a bits of code you'll see very often. Go into any post or page and click in the "html" tag to see the code that shapes some of your site.


<p></p>      


...That open and closes a paragraph.
You'll see this for basic text that appears in a site:  <p> hello there! I am your site!</p>


<h2></h2>  
  
...Any tag that has "h" and a number is a bit of text that will appear with a variation in size.  The "h" stands for heading and the number stands for a size. The lower the number the bigger the size!


<iframe></iframe>


...These tags surround Vimeo content.


<p style="text-align: center;"> stuff stuff stuff</p>


...You can "style" text in a variety of ways. Most of the time I'm styling text by aligning it, though there are many things you can do to text with this tag.


<a href= "http://site.com></a>


...<a> stands for "anchor" > Anytime you see "<a href=" used you are looking at code that's pointing to a link. Below is an example of a link that has a lot of extras thrown in. The link below specifies a title for the link (that will appear on mouse over), tells that an image is what's being used in the link, tells where the image comes from in the host directory, and tells how large the image is. Wheh... lots of info in there....


<a title="ZEN ESTILO" href="http://digitalfilmcolorist.com/123-2/"><img class="alignleft size-medium wp-image-19" title="ZEN ESTILO" src="http://digitalfilmcolorist.com/wordpress/wp-content/uploads/2011/08/ZEN-ESTILO-300x225.jpg" alt="" width="180" height="136" /></a>


There's a really great source for learning about html and css called W3schools.com
This is a free site and even if you don't go through it in great details it can be used as a quick reference for you to understand what a bit of code is doing in your site. Just cut and paste a sample of code from your site into the W3schools search box!


DFC custom notes: site structure

In Building the DFC site the Fullscreen them Graph Paper Press Template I used posed some pretty interesting dilemmas...

First of all the home page or landing page rules the site. That's core to understanding the site because all organization bows the the restrictions imposed by this home pages which pulls images for display. It;s the first thing a visitor to the site sees so in this case, this page gets to be the big boss.

If you look at the home screen you will see two sets of thumbnails. At top are movie thumbnails, and at bottom are post thumbnails. This segregation of "page" and "post" images feeding into each area allows me to add images and updates to each location and have some sway over where the images go.  Generically this template pulls images from only posts.

The second factor about the home page that has influenced the organization of the site is that the images on the home page appear in order from most rest to last. That means if you put up an image it will pop up on the home page. But what if you don't want the new image on the home page? The nice part is that pages and posts are easy to organize by editing publish dates and in some cases using plugins to order pages.

For more info about how I ordered pages ( with the home page in mind all the while) see the post in this blog posts titled:

Adding order to posts in Wordpress

and

Organizing pages via Wordpress plugin

Thursday, September 1, 2011

Scale Images Wordpress: scaling images after upload

When I start building a site I usually rush to put up content. Its something like the feeling of a canvas being easier to work on after you've added that first dab of paint: the void is just a little too much to tackle on a whole and too much planning before you start can start to build anxiety or uncertainty around the actual beginning!


So that being said- I often upload images at a large scale and understand afterwards what the the realistic scale I'll need to use them at actually is.  You'll be glad to know that Wordpress has planned for this sort of behavior.

Go into your dashboard and go to the "Media" section. Under "Media" select library and find all of your images noted here. Hover over the image title and select "Edit" from the menu that appears below.
Once you are in the screen where you can edit your image look to the left and see "Scale Image". Select "Scale Image" and the panel will expand.

After loading my images of all sizes I realized the largest dimension any image would need in the site was 300px. I've gone back through my site and made 300px the cut off dimension for all of my images--- some images even have a cut off of 180px.

Scaling images in this way optimizes your site-- this means a page that shows an image at 100px by 100px doesn't spend time processing a much larger image and then scaling it down. The end result is a site where pages load as quickly as possible!

Sorting Images in Wordpress Media Library


A Wordpress media library can easily become muddled-- you may load more than one version of an image and only remember this later when you go to alter that image and have a hard time finding it. Another dilemma you may run across is that if you make the image titles something funny and distinct, when you mouse over the image you see this weird title pop up on your website or blog.

The solution to this is very simple and one that's easily overlooked. When you are in your dashboard look under the "Media" category and go into your"Library" here you see all the images and icons you've ever loaded.

Simple select "edit" in the menu that pops up when you hover over a title. This should pull up all the info for that image. Here you'll see the title to the image but look below to the catagory called "Alternate Text". This is the are where you can put the actual name you want a visitor to your site to see when they mouse over your image. Use the main title for your own purposes if you need to. You can keep the original title hidden and use it for indexing.

Also note that when you are viewing all images in the media library if you look across the categories of information you will see one called "attached to" and this will tell you where the image is currently being used in your site or the "Location of the uploaded file."


A tricky thing here to note is that if you load an image and then remove it form the site afterwards but want to keep in in the Media Library the file will still be noted as located in the page you originally upload it to. Hence my interest in using titles as labels!


Tuesday, August 30, 2011

Adding order to posts in Wordpress

This is pretty simple to do. I added all the posts I wanted to my site then went through one by one and edited the date of publish- most recent dates appear first in order.


To do this I simply went into "edit" each post. I look at the page where I compose a post under the "Publish" section.
I look at the text that says "Published on: Aug 6, 2011 @ 18:42 Edit". I click on edit. I numbered my posts starting form 1.1.2011 all the way up to 1.21.2011. I make a note that all my posts are published at noon. If I need to add a post I can pick an hour of publish that falls between two existing publish dates and times. If I need to add a new post that shows up as the most current I can just pick the next date in my series of dates and that will show up first OR I can pick an earlier date and my new post will go way down to being the last post in the batch.


Also I went to my dashboard again and I went into the permalinks section. Here I selected the option to order my posts by day and name.

Organizing pages via Wordpress Plugin My Page Order


I've organized my pages on Wordpress using a plugin called My Page Order created by Andrew Charlton. You can look up this plugin via Wordpress, or follow the link. This plugin does a few very helpful things. After install and activation, it creates a new section in the "Pages" category of your Dashboard. Look under the "Pages" section and you will see "My Page Order" has been added.


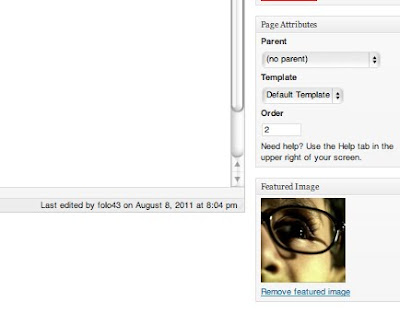
Click on this and you find yourself in a screen that lets you drag and drop pages into the order you want. Your pages will now have a number that appears in the " Page Attributes" section of your page when you view it in editing or composing mode.... See image below.